............................................Welcome To Grandma Bonnie's Closet.............................................

Friday, August 30, 2013

Cake Decorating Made Easy With Royal Icing & Ateco Decorating Tube Set

Disclosure: Grandma Bonnie's Closet was not compensated for the review of this product. I received a free product from ShopAtDean.com in exchange for an honest opinion. The opinions expressed are my own.

If you are a long time reader of Grandma Bonnie's Closet then you know that one of my favorite hobbies is cake decorating. I am always looking for new and interesting cake decorating products to play with. I often browse online in my spare time looking at cake decorating sites and supply companies. That is how I came across Dean Supply Online. I sat for at least an hour looking at all their kitchen and baking supplies. Then I came across the Ateco 55 Piece Decorating Pastry Tube Set. I began to dream of all the lovely cakes I could make with this awesome set. I thought why not ask for a set to review. My readers enjoy making cakes for their grandchildren/children. You all do, right!
Dean Supply Online is a family run business of 63 years. If you ever visit Ohio and are in the Cleveland area you might want to visit their showroom on Woodland Ave. Hmm, I bet that would make a good blog post.

On with the review. A little over a week ago I received this lovely 55 piece Tube Set. I was impressed with Dean Supply's friendly service and amazingly fast shipping. That is one reason I like to support family owned and run businesses. A good family business puts their customers first and works to see that they are happy and satisfied. I am indeed happy and extremely satisfied.
The set includes two Rose/Flower nails, a coupler for changing tubes and 52 decorating tubes(tips). Included in the 52 tips are multiple writing tips, string tips, star tips, border tips, and leaf tips. Best of all, these beautiful tubes came in a nice heavy duty case for storage. 
This is a pastry filling tip. Imagine how easily I can fill donuts and cupcakes with custard fillings. I will be testing this tip out soon and let you all know how it works. 
The tube to your left is a grass or hair making tube. The tube at the right makes borders and can be used to make a basket weave design on cakes. (Stay tuned for a basket weave cake post in the near future.)
I found the tips easy to use, easy to clean and fun to decorate cakes with. The important thing about getting tips clean after use is a brush made for tube cleaning or a pipe cleaner. I found the tubes easy to clean with pipe cleaners. The coupler that came with the set makes it easy to fill one pastry bag with icing and easily interchange tubes through out the decorating process.  
I used the coupler in this pastry bag. Just drop in the first piece of the coupler. Then add the tube on the outside of the bag and place the ring over the tube. I dropped the bag into a glass and folded the bag over to make it easy to fill with Royal Icing. I then covered my cake in white fondant. I selected a few interesting tubes to test. 
First I used tube #070 for the draped border on the top edge. Then tube #32 for the bottom edge. Next, I tried the rose tube #127 with the large rose/flower nail. It took lots of practice to get a few flowers to even begin to look like a rose. Well, at least they resemble a rose of sorts. Finally, I used tubes #34 and #4 to make leaves and vines. 
Now, I have a surprise for you. This is my first attempt at a YouTube video. I would love for you to watch this short video. I am demonstrating the use of the above tubes while decorating a cake with Royal Icing. It is a short video and I do appreciate your support. Thank you for watching.


I hope you enjoyed the video. Follow Dean Supply Online with Facebook and Twitter

Wednesday, August 28, 2013

Keeping My Favorite Photos Safe

Disclosure: I am participating in the Verizon Boomer Voices program and have been provided with a wireless device and six months of service in exchange for my honest opinions about the product.

Blog photos, family photos, and just everyday photos boy, oh boy have I got photos.  As a Grandmother, blogger, wife and traveler I have tons of photos I would like to keep safe. Today I am going to share a little about my photo saving problems and the solution I was able to come up with to solve this issue. I started out by asking myself a few questions. If you would like to join my brainstorming session and see where it leads. Please answer the questions with me. Feel free to express yourself in the comments section of the post. I would love to hear your ideas and solutions to this problem.  

How often do you use your cell phone camera to take pictures?

Many times I have found my cell phone camera useful in capturing that spur of the moment event that I would not have been able to because I did not have a camera on me. I think about the first time my grandson started walking. No one was expecting it at the moment. There were no real cameras lying about. So we all whipped out our cell phones and started snapping pictures as fast as we could.
Conclusion to question one. Cell phones are great for capturing life's most important memories.

How many photos do you have stored on your phone?

I have over 1,500 on my new phone. My new phone is only a few months old. The last cell phone I used had over 5,000 pictures and videos stored on the phone. I am wondering if I am the only person who does not delete photos.
Conclusion to question two. Cell phones sure can store a ton of photos. But are they safe?

How do you move your photos from your phone to your computer?

This is the one problem I have not solved until just recently. In the past when I wanted to move photos from my cell phone I would email each and every photo to myself. Although this was tedious and only allowed me to move one or a few photos at a time, this was my first choice of action. When I decided I had an over abundance of photos stored on my phone I would plug the phone into my computer and move the photos to a folder on my computer. My method was working fine until I lost my cell phone. Then I realized it was not the answer to my problems.
One would think I would have learned from my mistakes but I guess I am a little hard headed when it comes to changes. A few months ago my computer decided to just up and quit with out notice! What an untimely death. I was very lucky because my dear son was able to retrieve my photos off the hard drive and a few uncorrupted documents.
Conclusion to question three. After serious some thought. Storing photos on a phone or computer will not keep them safe.

Do you have a back-up storage system for your photos and important documents? 

I have always thought of purchasing an external hard drive for back up of our important documents and photos. I need to look further into a external hard drive for this purpose. In the mean time I remember at some point during the Verizon Boomer Voices blogger training program a speaker mentioning being able to back up photos taken from my phone automatically on to G+ or Google Drive. There is that ah ha moment! A little light bulb just lit up and was getting brighter as I thought about the memory. 
OK, I have a G+ account. Most bloggers I know have a G+ account. How hard can it be to set up my phone to automatically save my photos to my G+ account? This is kind of a technical issue and I am not the greatest at figuring out technical problems. 
Conclusion to question four. Saving photos in the cloud on G+ will make a great solution to safely storing photos. That is if I can implement this feature on my cell phone. 

I had to start somewhere so here we go.
My first step was to look up information on auto backing up photos on G+.from a mobile device
They have some great step by step information that is easy to follow on that web page. Next, I opened the preloaded G+ app on my Droid Razr Maxx HD. I looked into the settings hoping to find the camera and photos settings. I did not see this listed in the G+ settings. I must have opened and closed the app multiple times. I was fairly certain it was there I just was not finding the right listing in the settings. At this point I was frustrated and had thought of making a trip to the Verizon Wireless store near our home. (The time being 10:30 pm that was not going to happen.) I have on many occasions taken a trip over to one of their stores just to get answers or help with cell phone problems. I think it is the simplest way to get answers to technical problems with a cell phone when you just can't figure it out by yourself. I can tell you from experience that the Verizon Representatives are very helpful and extremely knowledgeable.

I have had a few application problems in the past on other cell phones. I thought back to other instances and came up with four steps I could take to get the G+ app to work correctly.
Step 1. Sign out of the application and sign back in. 
Step 2. Reinstall the application or update. 
Step 3. Get knowledgeable help. In this case I would ask my husband or son.
Step 4. Contact or visit the cell phone provider.

I am happy to report after following step one I was able to find the Camera and Photo setting listed in the G+ settings.
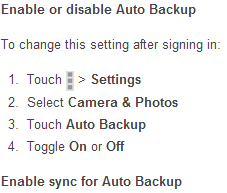
I followed these steps to set the auto backing up of photos on G+ from my cell phone.

This is such an amazing feature for a cell phone and application. I am now going to upload my photos to a photo printing website and have prints made of my most precious photos. .
My readers, What do you think? How do you back up your photos?  

Friday, August 23, 2013

A Little Walk

It sure has been a long week around here. I have been kept busy with yard work, gardening and to many other things to mention. I worked in the garden a little this week and wanted to update you on the results of the Weed Free Raised Bed. Although I mentioned recently how it did not remain weed free but had developed a few weeds here and there. I want to let you know that I have not spent many hours weeding this year. I have over all probably weeded about three or four times. I would bet all in total I have not spent more than an hour or two in garden work.  I must admit I have not gotten as many vegetables as I had expected. But I believe the soil many need some amending next year. That may help it to produce a little more. While I have been busy in other parts of our yard I took a few pictures while I walked around our yard today. I just forgot to take photos of our garden. I will be sure to get a few photos of our garden before the season ends.

Our largest apple tree has produced well this year. I can hardly wait for the apples to ripen. They are almost ready. We have another apple tree planted at the same time but it has only started to produce this year. So we may only get a handful from the second tree if any at all.

While getting some photos of our flowers in the front flower bed I came across this dragonfly. It seems to be molting. That is if they molt. Does anyone know if they molt? I thought the wings were spectacular!

This is the grapevines on the left side of our home. They are hanging on an arbor and our gazebo. That is all from one vine. It started out on the arbor and has grown so much we added a fence to the side. When it out grew the fence we built the arbor to help support the vines.We have another vine on the right side of our home. I just forgot to take photos on that side of our home. I may do that in another post. Any how this vine has always produced well but not excessively.
Well, last year it did not produce at all. Not even one grape. I was happy to see this year that it has actually produced tons of grapes.
.
I stood under the gazebo to snap this shot. This is just a small section of the ceiling in the gazebo. These grapes should be ready to harvest some time in September. They are just amazingly  beautiful! Don't you think?
Well, that is all for today. I hope you all have a great weekend. 

Wednesday, August 21, 2013

Male Dog Belly Band (Diaper) DIY

Our new dog has been with us for just over two weeks. Scooby is getting along fairly well. If you missed his introduction you can find it here. Now, when we got him from the pound they suggested I get a male dog belly band to prevent spraying in the house. He was not neutered so they felt this would be a problem. We decided to make it not become a problem. On our way home from the pound we stopped and picked up two belly bands from the pet store.
I had never seen or heard of them before. They are just a simple diaper band with an absorbent middle and elastic around the edges. They have a hook and loop closure that makes it easy to put on and remove. They can be hand or machined washed but not dried in the dryer. 
It started getting annoying not having enough belly bands. I was forever waiting for one to hang dry. I thought about going into town to buy a couple more. I really did not want to spend another $8 a piece for these simple diapers. Then it dawned on me I could make a couple from some of my sewing scraps. So my DIY was formed.
This is a DIY for a small Dog Belly Band
First you need to round up the following.
wicking fabric (I used an old tee shirt)
light airy fabric (cotton or flannel will do)
absorbent material (I used quilt batting)
PUL fabric (used for cloth diaper making)
hook and loop (Velcro)
2 peices 6" each of soft strech elastic (I used left over black PJ elastic)
thread of choice
news paper or tissue paper (any suitable paper for making a pattern)
Tape measure or yard stick
scissors
pins
sewing machine

Lay out your paper and measure one rectangle each  18" x 5&1/2" and  3" x 5". I should have made a third pattern 3&1/4" x 5&1/4". I did not but I just used the 3" x 5" and added a little to the ends. (I will explain that next)
I placed the paper patterns on each fabric. The first is the PUL fabric. I did not pin this I traced around the pattern with a marker making it a little wider than the pattern. I traced this because I forgot to cut a 3&1/4" x 5&1/4." The reason I did not use pins is I did not want the water proof backing on the PUL to leak. PUL should be sewn or pinned the least amount possible. 
The second it the batting. I pinned and cut two layers with the 3" x 5" rectangle. If your puppy/dog will use it as a diaper for potty training use three or four layers of batting.. 
The third is the two fabrics I selected. I pinned and cut one each. 18" X 5 &1/2." I will be using the print cotton fabric for the outside and the gray knit for the underside. 
Next, I sewed  some scrap hook and loop (Velcro) to the rights sides (on one end of each) of the two pieces of fabric. At the end I added two more strips of hook and loop as I felt it needed to be a little more secure. Which you will see in the end photos. 


Next, I placed the batting on top of the Pul fabric and ran a house hold glue stick around the edges. Then I folded the edges over neatly. The glue is just to hold the fabric and batting steady. The glue will wash out the first washing. I sewed the short sides on the edges once to hold the batting in place. Next time I might try using water proof permanent glue to hold the batting in place. I centered the padding on the wrong side of the gray knit fabric and sewed over the stitching at the ends. When I finished I realized I should have made a pocket to insert the PUL and batting. Then I would not have had to sew through the PUL making it lose its water proof seal. 


Next frame is the pieces right side up. Flip the cotton piece wrong side up and pin the elastic strips on the center outside edges. Stretch the elastic tight as you sew it to the edges. Place the two fabrics right sides together with the loop at one end and the hook at the other. In the end this will help them line up for securing the diaper. Sew along three sides leaving one short end open for turning the diaper right side out. 

The diaper is turned right side out. I then sewed carefully around the edges to help it lay neatly. Closing the open end at the same time.

Scooby has used this belly wrap a couple times now and it works just fine. It seems to be a little more comfortable than the store bought ones. They are made of a nylon fabric that is not as light and airy. 
Well, I am off to make a couple more belly bands. I hope you enjoyed this tutorial. Some time in the future I hope to make a Dog Coat tutorial for the upcoming cold weather. 

Thursday, August 15, 2013

Our New Pound Puppy

Disclosure: I am participating in the Verizon Boomer Voices program and have been provided with a wireless device and six months of service in exchange for my honest opinions about the product.

About two weeks ago when my granddaughters were visiting grandpa decided we should visit the local Dog Pound. This was totally a spur of the moment thought. I decided this might be a great learning experience for our granddaughters. On our way to the pound we talked about the reasons a dog might be in a pound. We talked about how the dogs are cared for in the pound and how it was different than a home for the dogs. The entire drive I kept thinking that it was just a trip to look at the dogs. We would certainly not be adopting one today.
When we arrived at the doors our conversation went like this.
Grandpa (my dear hubby): Casually "If we see a dog you like we can bring it home."
Grandma (me): "Cough, cough, cough what! Your kidding, right?"
Grandpa: "No, if you like one and the girls like it we can bring it home."
Grandma: Mumbling " I don't know about this! This is not really going to happen."

So we go inside. We had to wait our turn. There was a couple applying to foster dogs for the pound. Another couple was picking a dog to take home with them. We sat patiently in the lobby and talked to the receptionist. There was a cat just hanging around in the lobby that helped keep the girls occupied.
We then went into the back to visit the dogs in the kennel cages. I wish I had thought at the time to take a few photos but I was a little overwhelmed to say the least. In the third cage down sat a little Pomeranian dog. It was so small and cute. The dog's report hanging on the cage had the name labeled Nelly. The report also said she was found abandoned on the side of a road. Weight 5lbs., friendly with other cats and dogs. I wanted to hear more about her so we asked a few questions. We learned that Nelly was a boy. The pound did not know anything about him aside from the fact that he was probably 8 years old, friendly, house broken and loved lots of attention. They thought his owner may have went into a nursing home or passed away. The owners relatives must have abandoned him. I thought this little dog might just be perfect for us. I was worried that I did not know anything about a Pomeranian's temperament. Would he be OK with children? Would he make a good family dog? I quickly took out my Droid Razr Maxx HD and asked Google to search Pomeranian dogs. This is part of a clip of what I read.
Thanks to my Droid I was able to decide to take this needy little fella home that same day. If I did not have my phone I may have been even more hesitant to take this big step.
The pound assured us that if our new friend did not get along with King Arthur or had problems being around little children we could return him with out any problems. 
Meet Scooby-Doo


Our Grandchildren chose his name after lots of thought. I think it fits him just fine and he answered to it right away. I have a feeling he would come to any name as long as he has lots of love and attention. 
When we first got Scooby home he got a bath right away as his fur was tangled and matted with burs. He had only been at the pound a few days. They said they had been working on his coat slowly as it was in pretty bad shape. I could only imagine he must have been a sight. Scooby is terrified of brooms. I believe he may have been mistreated with a broom. He also gets very defensive when our feet get near him. I have to wonder what he has been through. 
Scooby-Doo meets King Arthur
Scooby did not care a bit about King Arthur even though K.A. was so sweet and got down on Scooby's level and tried to play with him. 
At this point we have decided to keep Scooby-Doo and give him the loving home he needs. 
What do you think? Have you ever adopted a dog or puppy from the pound. Are you an animal lover? What animals do you like most?

Tuesday, August 13, 2013

Fried Green Tomatoes With Gluten Free Breading

I have had an over abundance of green tomatoes in our garden this year. The tomatoes seem to ripening much more slowly than normal. Seeing all those green tomatoes gave me a craving for breaded fried green tomatoes. I decided to try making them gluten free so that my grandson Little Bug might be able to enjoy them also.

Ingredients
2-3 sliced green tomatoes
4 tablespoons almond meal flour
2 tsp coconut flour
1 egg
2 tablespoons milk
salt and pepper to taste
3-5 tablespoons olive oil for frying

Combine almond meal flour, coconut flour, salt and pepper in a bowl and mix well.   Mix milk and egg together in a small bowl. Heat the pan with olive oil. I used medium heat. Dip the tomato slices in the egg mixture and then dip into breading. Fry each side until golden brown. Place on paper towels to absorb oil. Serve cold or hot.

They sure did turn out tasty. They lasted about 15 minutes on our table. How do you like your tomatoes? Do you have a favorite summer recipe?

Monday, August 12, 2013

Quiet Again

You know the saying, "Time flies when your having fun." Well, time sure flew around here while my grandchildren were visiting. I enjoyed every minute of it and wish it could have lasted a little longer but that was not to be. I am now sitting here blogging and looking forward to a long visit on Skype with their little faces.
We took the children to an indoor water park of which we have many in our area.
 Sweet Pea and Pumpkin playing in the water spouts.
 Little Roo having a blast in the baby water spouts.
Pooh Bear in his Puddle Jumper splashing in the water spouts.
 Pumpkin getting ready to go on a water slide.
Sweet Pea taking a break with Grandma.

The last week after my granddaughters left the weather finally co-operated enough for my grandsons to swim in our pool.
 Little Bug getting ready to swim in our pool.
Pooh Bear having a blast in our pool.
The grandchildren also did a lot of swinging. 
 I am not sure what Little Bug is attempting but boys will be boys!

Look at Little Roo! He is trying to be just like his big brother Pooh Bear. He looks so determined to make that swing go!

Of course I have many more pictures but I will end for now before you become terribly bored. How is your summer going? Have you had any visitors this summer? What did you do to keep busy?

Wednesday, August 7, 2013

As Summer Rolls On By

It sure has been a very busy summer around here. I am watching the days fly by. I sure wish that we could slow down time for just a bit. My granddaughters have come and gone. My grandsons are now here for their weeks vacation. One of the best parts of all my grandchildren visiting for the summer was the weekend when I had four out of five grandchildren here at the same time. We tried really hard to get Little Bug to visit at the same time but that was just not meant to happen this year. Hopefully next year we can get all five together at the same time. I have a picture to share from the weekend. 
From left to right. Pumpkin, Sweet Pea, Pooh Bear and Little Roo!
How is your summer going? Do you wish time would slow down just a little? Or would you rather have summer to be over with real soon?

Monday, August 5, 2013

On My Way To Great Health With Fitbit One


Disclosure: I am participating in the Verizon Boomer Voices program and have been provided with a wireless device and six months of service in exchange for my honest opinions about the product.

Before you start to read this post I just wanted to let you know this is not just an ordinary product review. This product may be a life changing device for myself and many others. Because of this little device I am on my way to becoming fit and healthy. Over the last three weeks I have successfully lost 6 lbs using this device. For my readers who know me personally you know how I have been struggling with weight loss. I have finally found a device that is now working with me to succeed in my weight loss goals.

I am so excited today to be able to share my thought about this little device called the Fitbit One. Being a part of the Verizon Boomer Voices program I have been given the opportunity to try the Droid Razr Maxx HD which has become my favorite cell phone of all time. Along with the awesome cell phone I was given a Fitbit One to try. When I first saw the Fitbit I did not think much about it at all. I had it for two weeks before I even opened the box. Well, let me tell you that was a mistake on my part. I could have been ahead of the the ball game on getting fit and healthy if I had started right off using it.
That little device is the awesome Fitbit One.
This is the Fitbit with accessories.  

The Fitbit tracks the number of steps walked, that same distance in miles, calories burned, and stairs (floors) climbed. That's not all the Fitbit does it also encourages and motivates me to get active! If that was all the device did it would still be a great device in my book. But, there is still more. This little device can be worn at night to monitor sleep. It can also be set to wake me up by vibrating. The silent alarm is awesome for my husband. My husband works into the early morning hours. I can set my alarm to wake me silently leaving my husband sleeping soundly. The Fitbit can sync to your desktop computer and some smart phones. With the Fitbit program on my computer I am able to log the food I eat easily. The Fitbit program has an extensive food and calorie listing that helps me easily log and keep track of my calorie intake. 
I can log my food, weight, blood pressure, glucose levels, heart rate and activities. This can all be logged each day through out my day as time permits. 

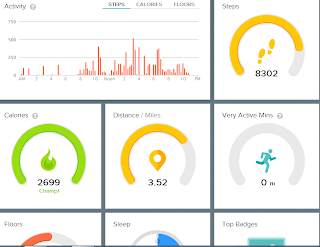
This is a part of my dashboard in my online account. I can check this out in a flash and see how my day is progressing. 
This is my sleep record for one day during this last week. It looks like I need to work on sleep. It's not as bad as you may think. My granddaughters have been visiting. Endless night time potty breaks and restlessness is the cause of this bad nights sleep. But this page does show you how well the Fitbit One tracks sleep.


These three screen clips are the logs for Blood Pressure, Glucose, and Heart rate. I have not started tracking these records but I hope to track my blood pressure and heart rate soon. 

This is one of the badges I have earned with my Fitbit One! I earned this badge this week. This is just the encouragement I need to keep on this awesome program. 

As you can tell by reading this post I really like my Fitbit One. This device is great and I can only think of a small change or two needed to make this an even greater product. The device is small and that makes it easy to forget that it is clipped to your belt or clothing. It is easy to forget the device and not move it onto a new change of clothing through out the day. If the Fitbit One could be set to beep or sound off during times of no activity. I might have a chance to realize I forgot to move the clip when I changed outfits. The Fitbit comes with a USB charging cord. The only problem I have is removing the device from the charging cord. 

Over all I love the Fitbit One. I plan to use it daily at least until I reach my weight loss goals.
What do you think? Have you been working on your health, fitness or weight loss?