............................................Welcome To Grandma Bonnie's Closet.............................................

Saturday, April 20, 2013

Birds, Boys, Bridges And More

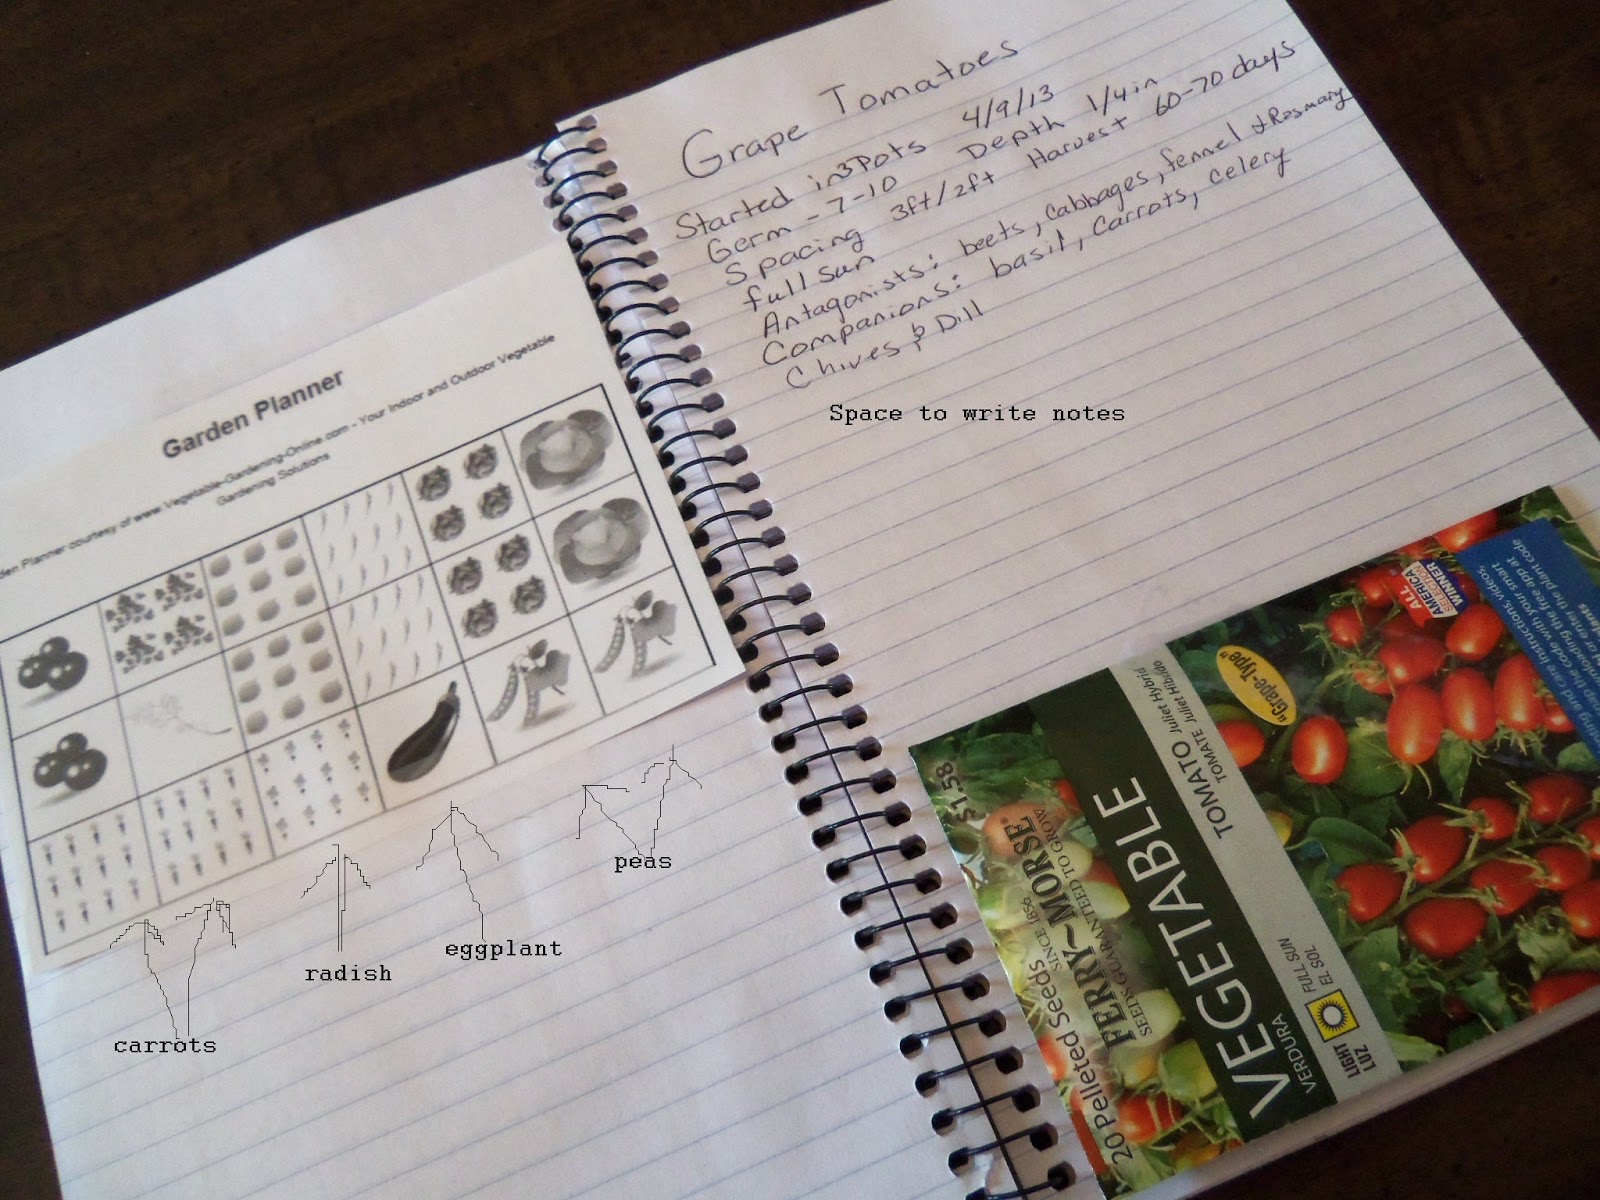
First off I really need to invest in a good camera. My little point and shoot is fine for every day use but it is not good for getting long distance closeups. That being said I have been watching all the bird that come to our pond to drink and bathe. I have seen so many beautiful birds I wanted to get dome pictures. Well, I tried getting up close and simply can not with out chasing them away. So the best I could do was snap a few photos from a distance. They are not the best but I think they will do.
I believe this is an Northern Cardinal. He has been stopping by every day. I am wondering where he is nesting. 
I am guessing totally on this one. I have been doing some research and I believe this is an American Goldfinch. I saw about seven or eight of these pretty little birds hanging out in our apple tree. If you can identify either bird with these terrible pictures let me know in a comment. 

Over the last few days we have been building a bridge by our pond. Keep in mind we have no carpentry skills and certainly no bridge making skills. We used wood from an old pallet and some left over wood from our deck project. 
While we were our working on our bridge Little Bug wanted to help. Moving all that dirt was hard work and loads of help. 
Our bridge has a few little details left to finish but our grandchildren can now feed the fish with out falling into the water. What do you think?

That is Pooh Bear and Little Roo. They sure are growing up fast. They are going to be visiting with us this week. I may not be blogging much while they visit. 
You had to know this was coming. I could not forget my granddaughters. Pumpkin and Sweet Pea. They are  my little princesses. I hope you all have a great week. I will be back soon.

Friday, April 19, 2013

Reading Eggs For My Grandchildren

A few months ago I was given the opportunity to try the Reading Eggs Program for my grandchildren. I was offered this trial for a review of their program. The program is great for children ages 3 to 13. I actually sat down beside my granddaughter Pumpkin and guided her through the site. We explored together. Then I let her on her own to see how easy it would be for Pumpkin to navigate the site and all its pages. Pumpkin is 5 years old and in kindergarten. She had no problems using Reading Eggs and enjoyed the fun learning games.
I simply was amazed that educational games were not too easy or too hard for her to play. As she progressed through the levels the games got a little harder and she was able to catch on with out getting frustrated. 
I am sure you are asking "What did you like most about the program?" I liked that the vocabulary words for Pumpkins age level. They were the same vocabulary sight words she was working on in her kindergarten classroom. Playing all the reading games helped her to practice her vocabulary words in a fun way. 
Reading Eggs would make a nice birthday gift for a your child, niece, nephew or grandchild. If your grandchildren live far from you this would be an easy gift to give. I know how much fun Pumpkin had playing and learning at the same time. I don't even think she realized  that she was playing educational games. Just stop by Reading Eggs if you would like to sign up for a free trial and see if your child or grandchild like this program.

Thursday, April 18, 2013

5 Tips To Help Make Your Vegetable Garden A Success

By now you might be able to guess I am anxious to get my vegetable garden going. I have been scouring the Internet and reading all my gardening books for all the best tips in growing a great  vegetable garden. I figured as I am working on my garden I would share the information I found with all my gardening friends.

1. Save all your egg shells for your garden soil. What I do is crush the egg shells in to small bits and add it to my garden soil. This will give a boost to your vegetables. I also throw a handful into the holes where I am planting my tomato plants. This will help prevent blossom end rot.

2. Sprinkle a hand full of coffee grounds around your vegetables. The coffee will slowly release nitrogen which is very beneficial to your vegetable plants.

3. 1 tsp of Epsom salts and 4 cups of warm water sprayed on your plants will produce a boost in fruits in about ten days. Now this I have not tried. I have sprinkled Epsom salts on the soil around my plants. I will try this tip and see how it goes.

4. I found this on Pinterest. DIY plant food. I am going to try this.

Mix 1 cup coffee grounds, 2 crushed egg shells, 1/16 oz. ammonia, 1 cup water, 1/8 tsp Epsom salts. Stir well. Spoon this around the base of your flowering plants, except African Violets.


5. One last tip. I am planning to use this watering method with some of my vegetable plants. I found it on Pinterest of course.

Last years photo of the Mini Farm Sustainability Project. I am lending the same raised beds this year to their project. We can't wait to learn more from their gardening techniques.
I hope you will be able to benefit from some of these gardening tips. If you have any great tips to share please leave them in a comment. Happy Gardening.

Saturday, April 13, 2013

My Garden Planner

It's that time of year when everyone is planning their vegetable garden. With dreams of beautiful vine ripe tomatoes turning their rosy red cheeks up to the sun. I do need to get out doors and get my hands in the dirt. Although it is still cold out there is something we can all do now while we are waiting for the weather to warm up a bit. We can plan our garden on paper. Most every gardener does their planning differently. A few years back I was the type of gardener that just bought plants and seeds. Planted them in the tilled soil, watered, weeded and hoped for the best. Some years I did better than others but over all my garden did poorly. For the last few years I have been putting more effort into my garden and a large bounty of fresh vegetables has been my reward.
First off I plan my garden out on paper. Did you know that some vegetables have friends and other vegetables have enemies. Well, not really enemies but their called antagonists and friends would be called companions. While planning I first read the package instructions. How much sun and room do the seeds need to grow at their best. Is the plant a cool season vegetable or do they need to be planted after the threat of frost has passed. Then I check a chart I have that will tell me which plants I want to place each vegetable beside. I use this chart so I do not plant enemies together.

For example:
The Tomatoes plants companions are basil, borage, carrots, celery, chives and dill. The antagonists for a tomato plant are beets, cabbages, fennel and rosemary. 
You can find that chart here.

Then I make a graph of my garden. I plan out each section carefully. making sure tall plants do not shade vegetables that need full sun. I try to plant water loving vegetables on one side and those that do not need watered every day on the other end.  I think you have got the idea. This year I found a garden graphing tool on line. It was easy to use. Just put in your garden size click on the vegetables you want on your graph and drag them where you need them. Then print the graph. 
You can find that tool here.

I keep all this information in a loose spiral notebook. This makes it easier when I am in my garden planting I do not have to stop what I am doing and hunt through my gardening books to find this important information.  In my notebook I keep a page for each plant type. 
For Example:
Grape Tomatoes
Started in pots: 4/9/2013      Planted in garden: -------
Germ 7-10 days      Depth 1/4in
Spacing 3ft/2ft         Harvest 60-70 days
Full sun
Antagonists: beets,cabbages, fennel and rosemary.
Companions: basil, carrots, celery, chives and dill.
I attach the seed package to the page. 
As the season goes by I keep notes about the plants. Such as when I fertilize, how well the plants are producing and if the plants get an infestation I record what I used to treat the problem. All of this information will come in handy so I know if I want to purchase this variety of tomatoes next year. It can also help me learn what types of gardening techniques work best.  


Have you planned your garden yet? What are you planning to grow? Do you have a favorite vegetable to grow or eat?

Thursday, April 11, 2013

Starting Vegetable Seeds With Recycled Containers

Even though it's still cold and actually raining like crazy outside at this time. I have been planning my summer vegetable garden. I have been saving lots of food containers for this project. I like to reuse as many plastic containers as possible. I though about buying those nice little gardening posts that degrade in the soil once planted. It would be nice to have such gardening supplies but I am a penny pincher by nature and lets face it reusing and recycling is free.
First collect your supplies.
Spade
Soil
Seeds
Containers
Glue
Pen
Garden Record Notebook
Poke holes in the bottom of your containers. Three to four holes will be sufficient.
Optional step: Glue the container lids to the bottom rim of the container. This should catch excess water.
Now add soil to the containers. I am planting tomatoes in these containers so I added crushed egg shell to the bottom layer of soil. Then I added more soil on top.The egg shell will help prevent blossom end rot on my tomatoes.
Next press seeds into the soil. I pressed three seeds into the soil cups. I will thin and keep the best in the pot until time for planting in my garden.
I labeled each container with seed type and germination rate. If some seeds do  not sprout in time I can quickly add more seeds. 
I used deli containers, fast food containers, vegetable containers that held mushrooms and strawberry containers.  The last container I used was a deli chicken container that I made a little green house for my grandson and his eggplant seeds.

Well folks that's all for today. How are your garden plans coming along? Have you recycled anything lately?

Conscious Box Three Months Subscription #Giveaway

When I first heard about Conscious Box I was very curious as to what they were all about. I did a little research and came to the conclusion a Conscious Box subscription was just the perfect way to test new Eco-friendly products that conform to my families way of life.
I know most of my friends try to use planet friendly products that are also healthy for their family. With a subscription to Conscious Box you will be able to try products from 10-20 business that have been handpicked for their healthy, natural, non-toxic and Eco-friendly nature. 
If you would like to see what they are all about you can stop over and check out Conscious Box at your convenience. Conscious Box has been kind enough to offer the readers of Grandma Bonnie's Closet a 50% off discount for any Conscious box subscription. Use the code: LOVELIFE
If you would like a chance to win a three month subscription to Conscious Box($59 value) enter the raffle copter below. 

a Rafflecopter giveaway


Disclaimer:
Grandma Bonnie's Closet will receive a promotional item in compensation for hosting this giveaway.

Monday, April 8, 2013

Surviving A Power Outage In Reasonable Comfort

Recent long term power outages the last few years have got me thinking about ways to make life bearable during a power outage. The longest power outage I have experienced was about five days. That was during a blizzard when I was a teenager. I can remember we had a coal burning stove in our kitchen and a wood-burning fireplace in our living room. This was during the Energy Crisis in the 70's. My parents had added the wood burning fire place and coal stove to reduce our energy bills. I can remember the neighbors not having it so easy. They depended on electric heat and did not have a fire place. Of course they were invited to ride the storm out in our home but being that the storm was in full force they did not want to risk venturing out into the storm.
Thinking about the past has reminded me that being prepared can make the difference in  having a tolerable experience or suffering a great deal. Now I ask, "How are we prepared today for a long term power loss?"
Below is a list of preparations we have made or are making as a family to prepare for emergency power outages..

1. A non-electrical heat source. Such as a kerosene, gas or propane heaters.
2. A cooking source. Gas or charcoal grill (for outside use only), portable propane camping stove or canned heat with a folding camp stove. Canned heat can be found in most camping supply stores.
Sterno type.
Single burner folding stove.

3. Several light sources. Flash lights with extra batteries, candles, and oil lamps. You can find a DIY for homemade oil lamps here. Do not forget matches or lighters.
4. Portable energy source if possible. Not necessary but highly recommended. A small portable generator would be nice to have. This would keep your refrigerator and freezer working to save food from spoiling. 
5. A non-perishable food source for at least three days. Canned and dried foods will keep for months or years if stored properly. 
6. A battery operated radio. This may be your only news source for a while if phones are not working.
6. Last but not least some little extras to help pass the time. In a world of electronic gadgets we need to remember with out power our entertainment devises may not remain charged for long. A few new unread books, magazines, and crossword puzzle books are great for personal enjoyment. A board game or two might be great for family fun. For our grandchildren we keep a few new coloring books, crayons, puzzles, and a paint or craft set. These can entertain children for many hours. 

I keep most of these items in a plastic tote. With the exception of our kerosene heater, oil lamps and camp stove that are kept in our utility closet. I have recently added to our emergency tote one large first aid kit, hand sanitizer, wet wipes and a list of emergency contacts. 
How are you prepared for emergencies such as a power outage? Do you have any good advice?