............................................Welcome To Grandma Bonnie's Closet.............................................
Showing posts with label garden. Show all posts

Saturday, May 3, 2014

In The Garden

Not so much going on in my garden yet. Even the cold weather plants are struggling. I am guessing the garden soil has not warmed up enough yet. It sure is going to be a short growing season if this keeps up. Even the hardy pea seedling are struggling to grow.
I plan to plant my tomato seedlings next week after Mothers Day. Hopefully that will be past the last frost in this area. Pooh Bear and Little Roo are coming for a visit this week. I am looking forward to their visit. They should keep me very busy. I will share some pictures of their visit if I don't get too busy. Well, I wish you all a great week in your garden. Happy gardening.

Saturday, April 19, 2014

Protecting Garden Seedlings From Spring Frost And Snow

Back at the beginning of the week I saw the weather forecast and almost cried. There was a forecast of snow and cold temperatures.  My garden seedlings had just poked their heads up out of the soil. I know the peas would probably be OK because they are cold tolerant. I just did not want to take a chance.  Last year I lost many plants to an unpredicted frost. This is what I did to protect my seedlings.
I had a bin of plastic water bottles that were headed to the recycling center. I cut off the tops of the water bottles and pressed them in the soil over the seedlings.

It worked amazingly well. Complete portable protection. I waited for the snow to melt off the following day and took the bottles off ASAP. I did not want to overheat the seedlings. How is your garden coming along? Happy Gardening! 


Thursday, March 27, 2014

Garden Planning

I have been itching to get outside and start my garden since about January. I am sure those of you who have had to endure this too long and too cold winter just might be feeling a bit like myself. I have been looking over my seed catalogs, reading and researching gardening methods and just daydreaming about my spring and summer garden.
I have plans to extend my vegetable garden this year. I will be trying a new gardening method of which I will be writing about in the next few weeks. The new method is a bit like the weed free raised garden bed I tried last year. I will be posting often about the new products I am using to keep my garden producing throughout the spring, summer and fall. I invite you to follow along with me on this new garden learning experience. If your green thumb is itching to get into your garden you may just want to stop over and read a few of my other garden posts for some great tips on keeping a garden planner, tips for gardening success and much more. Well, off I am to do some spring garden clean up, and get a few seeds started in side.  

Sunday, July 28, 2013

Part 2 My Granddaughters Visit

I have been busy, busy and really busy. My granddaughters are keeping me on my toes. I am just loving every minute of it. I have a few more pictures to share. I hope you enjoy.
Pumpkin working on her reading skills. We keep her practicing her reading and writing skills. 
Sweet Pea had to do her school work also. We are working on her coloring skills.
Lots of sand and sun.
Learning sand castle construction. Now that important!
We weeded and weeded. Then the girls had a lesson in how to tell when a radish is ready to pick. They picked radishes, tomatoes and a couple pepper plants! Yes, I said they picked a couple pepper plants. Grandma forgot to explain that pepper plants are like tomato plants. Just pick the fruit. Lol, they thought pepper plants were like radishes just grab the plant and pull. We had a good laugh, crossed our fingers and replanted the poor pepper plants. I guess you can take the girl out of the city but you can't take the city out of the girl. Ha ha! 
How is your garden growing? Do you have any good pepper plants? 


Monday, July 15, 2013

Weed Free Garden Follow-Up

I know a few of my readers have been waiting to see how my Weed Free Raised Garden Bed has been doing. Although I was skeptical I had hoped it would remain weed free through the summer. I have some good news and some bad news. 
Everyone wants the bad news first right? There are weeds in my garden bed. Not many but there are weeds. That is too bad but now for the good news! I am pleased to say even though there are weeds in my garden the weeds I found have not come up through the ground. The weeds I see have most likely gotten there by wind and critters. These weeds are easy to pull and require hardly any effort to remove. 
Weeds and grass growing by our cucumber plants.
My tomato plants a few weeds around them. 
These are a few of the weeds I pulled. I was able to pull roots and all with very little effort. 
Although the weed free part was a little disappointing, over all I am fairly satisfied with this garden method. I have spent very little time weeding. I believe at this point weeding frequently before the roots of weeds take a strong hole is my best bet. I hope to update again in the fall. 
Readers do you have weeds in your garden? How is your garden growing? I would love you to share your favorite garden tips in the comments? Thanks for stopping by for a visit.

Tuesday, May 28, 2013

How To Start A Weed Free Raised Garden Bed

To start off you will need something to use as a retaining wall for your garden bed. I had some leftover wood from a wood pallet and some 4x4's from our deck project.
Next you will need a supply of cardboard or newspaper. Earlier this year I started saving pizza boxes, soda cartons and other boxes from purchases.
Now decide where and how big you want your raised bed. Then lay out your cardboard flat right over the grass. I overlapped the cardboard just a little. I have been told the grass will die under the cardboard or newspaper. The cardboard will break down into the soil as the summer goes on.
Next lay out your wood or other material to help retain the soil. Cinder blocks would work just as well in this instance. 
Now fill the inside with about twelve inches of soil, peat-moss and other soil amendments. I added 14 bags of organic soil and two large bags of peat-moss. 
At this point I had my husband put some stakes around the out side of the garden bed. This will stop the heavy soil from pushing the 4x4's outward. 
I then added my started vegetables
I am looking forward to keeping a record of how my vegetables do in my garden planner. This is the first time I am trying this new raised bed method. I have been thinking that I probably should have put the raised bed together in the fall so it could have sat over the winter. The cardboard would have been nearly decomposed by spring. No matter now I will keep you informed how this method works for me. What do you think? Do you think it will remain weed free for this summer at least? Have you planted a garden this year? Do you use a raised bed method? 

Thursday, April 18, 2013

5 Tips To Help Make Your Vegetable Garden A Success

By now you might be able to guess I am anxious to get my vegetable garden going. I have been scouring the Internet and reading all my gardening books for all the best tips in growing a great  vegetable garden. I figured as I am working on my garden I would share the information I found with all my gardening friends.

1. Save all your egg shells for your garden soil. What I do is crush the egg shells in to small bits and add it to my garden soil. This will give a boost to your vegetables. I also throw a handful into the holes where I am planting my tomato plants. This will help prevent blossom end rot.

2. Sprinkle a hand full of coffee grounds around your vegetables. The coffee will slowly release nitrogen which is very beneficial to your vegetable plants.

3. 1 tsp of Epsom salts and 4 cups of warm water sprayed on your plants will produce a boost in fruits in about ten days. Now this I have not tried. I have sprinkled Epsom salts on the soil around my plants. I will try this tip and see how it goes.

4. I found this on Pinterest. DIY plant food. I am going to try this.

Mix 1 cup coffee grounds, 2 crushed egg shells, 1/16 oz. ammonia, 1 cup water, 1/8 tsp Epsom salts. Stir well. Spoon this around the base of your flowering plants, except African Violets.


5. One last tip. I am planning to use this watering method with some of my vegetable plants. I found it on Pinterest of course.

Last years photo of the Mini Farm Sustainability Project. I am lending the same raised beds this year to their project. We can't wait to learn more from their gardening techniques.
I hope you will be able to benefit from some of these gardening tips. If you have any great tips to share please leave them in a comment. Happy Gardening.

Saturday, April 13, 2013

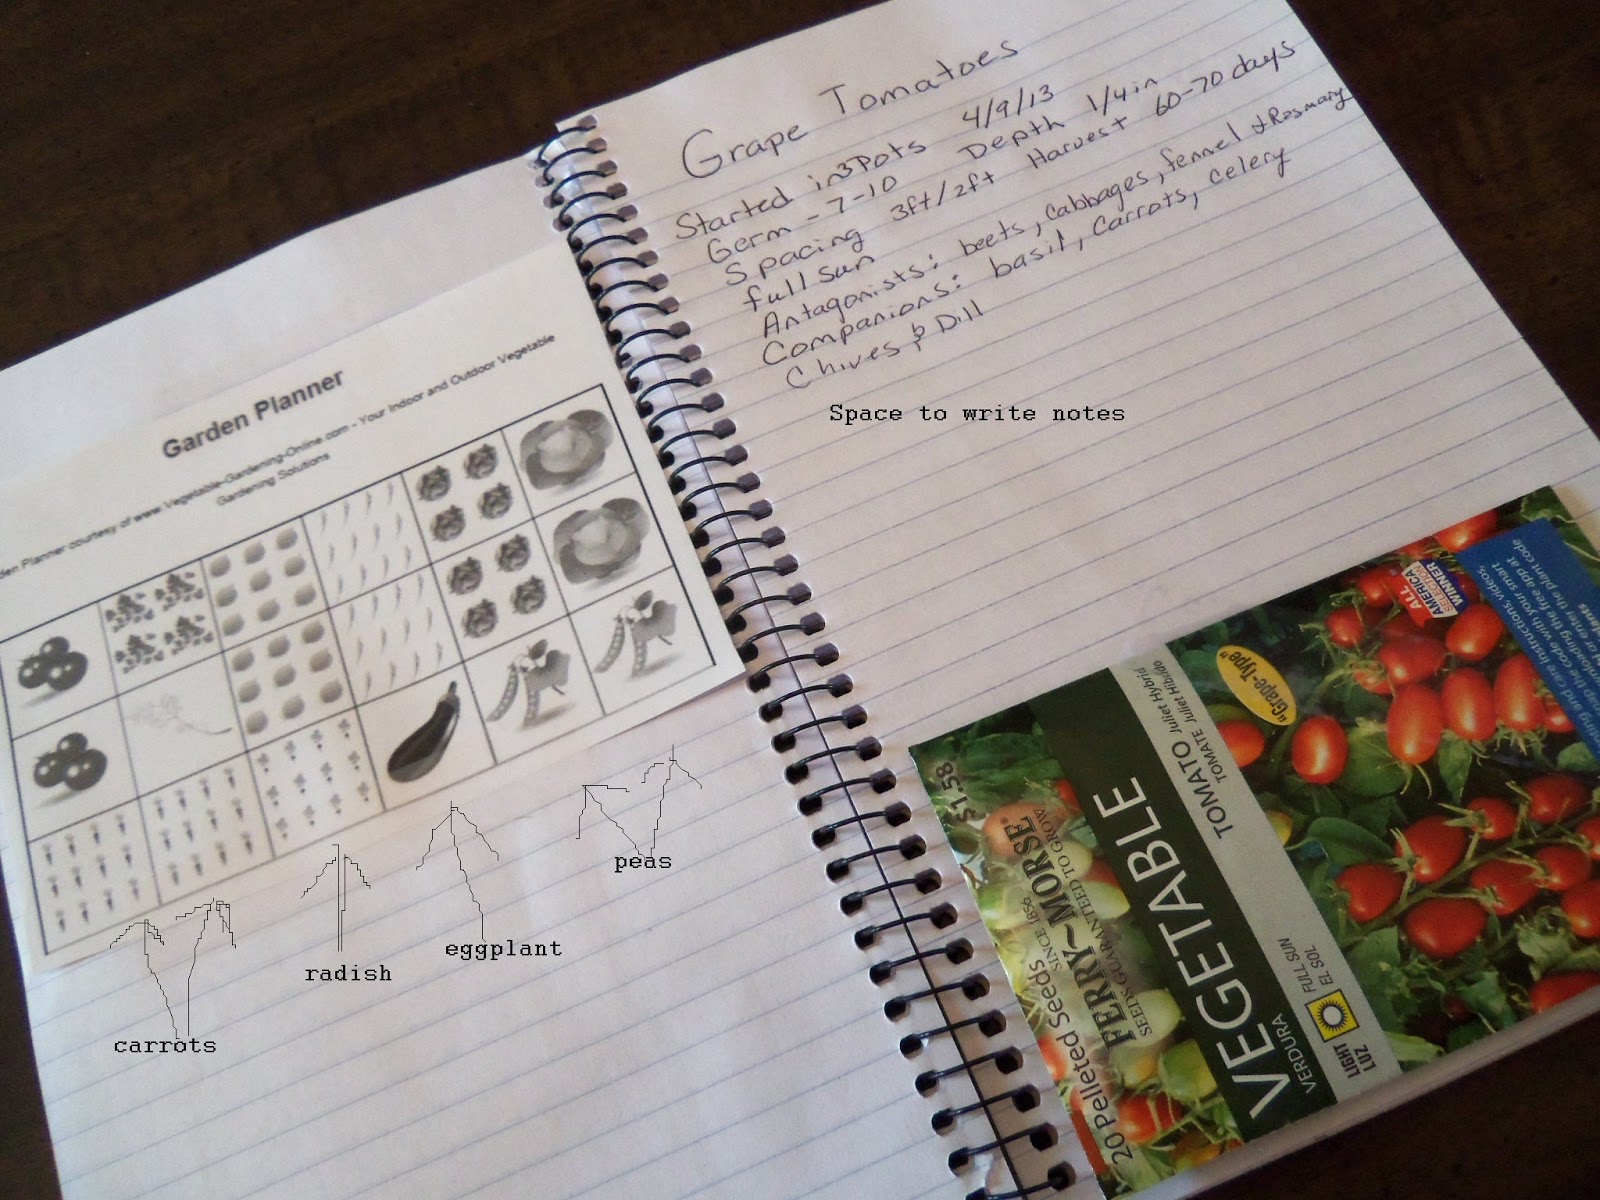
My Garden Planner

It's that time of year when everyone is planning their vegetable garden. With dreams of beautiful vine ripe tomatoes turning their rosy red cheeks up to the sun. I do need to get out doors and get my hands in the dirt. Although it is still cold out there is something we can all do now while we are waiting for the weather to warm up a bit. We can plan our garden on paper. Most every gardener does their planning differently. A few years back I was the type of gardener that just bought plants and seeds. Planted them in the tilled soil, watered, weeded and hoped for the best. Some years I did better than others but over all my garden did poorly. For the last few years I have been putting more effort into my garden and a large bounty of fresh vegetables has been my reward.
First off I plan my garden out on paper. Did you know that some vegetables have friends and other vegetables have enemies. Well, not really enemies but their called antagonists and friends would be called companions. While planning I first read the package instructions. How much sun and room do the seeds need to grow at their best. Is the plant a cool season vegetable or do they need to be planted after the threat of frost has passed. Then I check a chart I have that will tell me which plants I want to place each vegetable beside. I use this chart so I do not plant enemies together.

For example:
The Tomatoes plants companions are basil, borage, carrots, celery, chives and dill. The antagonists for a tomato plant are beets, cabbages, fennel and rosemary. 
You can find that chart here.

Then I make a graph of my garden. I plan out each section carefully. making sure tall plants do not shade vegetables that need full sun. I try to plant water loving vegetables on one side and those that do not need watered every day on the other end.  I think you have got the idea. This year I found a garden graphing tool on line. It was easy to use. Just put in your garden size click on the vegetables you want on your graph and drag them where you need them. Then print the graph. 
You can find that tool here.

I keep all this information in a loose spiral notebook. This makes it easier when I am in my garden planting I do not have to stop what I am doing and hunt through my gardening books to find this important information.  In my notebook I keep a page for each plant type. 
For Example:
Grape Tomatoes
Started in pots: 4/9/2013      Planted in garden: -------
Germ 7-10 days      Depth 1/4in
Spacing 3ft/2ft         Harvest 60-70 days
Full sun
Antagonists: beets,cabbages, fennel and rosemary.
Companions: basil, carrots, celery, chives and dill.
I attach the seed package to the page. 
As the season goes by I keep notes about the plants. Such as when I fertilize, how well the plants are producing and if the plants get an infestation I record what I used to treat the problem. All of this information will come in handy so I know if I want to purchase this variety of tomatoes next year. It can also help me learn what types of gardening techniques work best.  


Have you planned your garden yet? What are you planning to grow? Do you have a favorite vegetable to grow or eat?

Wednesday, April 25, 2012

Turning Garden Soil by Hand.

If you have a garden post stop over and link up with Garden Club Thursday  and Frugal Days Sustainable Ways.
Grandma Bonnie has lent a garden plot to the Mini Farm Sustainability Project. The project coordinators are turning the soil by hand. They are double digging the garden and adding organic fertilizer.


Of course my grandsons had to be part of the fun. I will keep you up dated on the progress of this garden. The garden will be completely taken care of by the project coordinators while teaching us their unique gardening method. For more information stop over and visit theMini Farm Sustainability Project.