............................................Welcome To Grandma Bonnie's Closet.............................................
Showing posts with label cake. Show all posts

Monday, April 27, 2015

DIY: Sandcastle Beach Cake

Its been a long time since I have posted on my blog. I would like to introduce my guest Tootsabella and the Rose posting the sandcastle beach cake.
Hello everyone!
I am Tootsabella Rose guest posting from Life with Tootsabella and the Rose
Recently, Grandma Bonnie from Grandma Bonnie's Closet and I had made this super cute and tasty sandcastle beach cake.
We had such a great time with this cake that we both agreed that it was the easiest and most fun cake we have ever made. It looks challenging for sure but I assure you the non cake decorating person can do this. If you are interested in making this cake, head on over to my blog for the details and more pictures. Enjoy the cake and have a wonderful day!

Sunday, November 10, 2013

Christmas Cup Cake Wreath Made Easy With Signature Brand Products

Disclosure: Grandma Bonnie's Closet has not been compensated for the following product review. I received product samples for review purposes. All opinions expressed are my own. You can find the following Signature Brand Products on my Holiday Gift Guide. 

We are always busy during the holiday season. With all the rush it is often hard for me to find the time to make an extra special Christmas cake. I love decorating cakes for any occasion. When I am in a rush cupcakes are simply a better choice for most occasions.
With the holiday season sneaking up on us so quickly I thought I would share with you an easy but fun Christmas Cup Cake Wreath.


Supplies needed:
 Betty Crocker No Fade Baking Cups

The No Fade baking cups are high quality, foil lined, standard size, paper cupcake liners. They not only look great on my cupcakes they did not fade or leak. I just love how pretty they make my cupcakes look. 

Christmas Wreaths Candy Cake Decorations
I found the candy Cake Decorations easy to remove from the packaging. There were 16 pieces in the package. I love the bright colors of each piece. They would be perfect on cupcakes, cakes, brownies and even cookies. 
The Christmas Decor four pack is perfect for all your Christmas decorating needs. The package includes green sugar, red sugar, Holly Berry Decors and Jingle Mix Nonpareils. Not only are they pretty on cakes, cupcakes, and cookies they are perfect to use for decorating ice cream for your grandchild. 

Lastly, Butter Cream Icing and cake batter. (scratch or box mix your choice)
Red and green food coloring to color your icing.


Fill your baking cups 2/3 full with batter. Bake according to the instructions on your recipe or box mix. 
I baked 24 vanilla cupcakes. I used 18 cupcakes for the wreath. You can use all 24 to make a  larger wreath. 

I iced the cupcakes with a star piping tip.

Decorate your cupcakes with the candy cake decorations and the colored candy sprinkles. 
Pipe a ribbon at the top of your cupcake wreath and you are finished. 
If you are not in the mood to make a wreath you can also make a few Christmas tree, snowflake or Santa cupcakes.


I hope this will pass along some holiday inspiration. What is your go to dessert for the Holidays? 

Wednesday, October 2, 2013

My First Verizon Boomer Voices Party

Disclosure: I am participating in the Verizon Boomer Voices program and have been provided with a wireless device and six months of service in exchange for my honest opinions about the product.

I am in the final phase of planning for my first Verizon Boomer Voices House Party. I can hardly wait until Saturday the big day. I know you understand all the work involved in planning a party.  I am sure you have been wondering why I have been missing from the blog world these past few days.  Well, this is what I have been busy doing. Party planning can sure keep a Grandmother busy.
First, I planned a great cake. You had to know I would be making a cake. It has a Verizon Boomer Theme and revolves around being connected.

One of my friends helping trim up a modeling chocolate cake topper I made. With Jess's help I was able to make two really nice cake toppers. Two more toppers are in the making. 
I have several great Verizon Wireless products to show off and giveaway to my party guests. One of my favorite products is going to help a family stay on top of whats happening at home while away from home. Another product will be keeping a party guest on top of their health. There are lots more products to give away. I will fill you in right after the party. My party guests will be playing a Verizon Trivia game that yours truly has made up.  We will also be playing a game I am calling "Get Connected if the Price is Right"!
Each of the party guests will be taking home a swag bag filled with lots of goodies courtesy of Verizon Wireless. 
I have got to get back to getting this party put together. Check back after the weekend for lots of party pictures and information on the products I am giving away at the party. I hope you all Stay Connected!

Monday, September 9, 2013

Nordic Ware Castle Bundt Pan & Fondant Decorations

Disclosure: Grandma Bonnie's Closet has not been compensated for the following product review. I received a product sample for review purposes only.

"Grandma has a new cake pan!" I can hardly wait to tell you about this new Nordic Ware Bundt Cake Pan I requested to review. One day while looking for cake pans online I came across Chef's Corner Store and this fabulous Castle Bundt Cake Pan.
I was totally excited when I saw this Castle pan. I love making cakes for my grandchildren. Can you imagine a castle cake with knights, horses, and dragons? Or How about a castle cake with princesses and fairies? My grandchildren are sure to have some very memorable birthday cakes in the near future. 
So now that I got my pan I wanted to use it correctly. I read the instructions that came with the pan.  I also was given some very good tips from Stephanie at the Chef's Corner Store.
Tips for getting a good release from your detailed bundt pan. 
1. Wash you pan thoroughly with warm soapy water and dry well.
2. Coat your pan with a baking spray. The baking spray should contain flour in it. Very Important! Use a pastry brush to evenly distribute the spray into every crevice. Make sure there are no globs of flour or pools of oil in the pan. 
3. Fill the pan about 3/4. Roll the pan from side to side to coat the walls of the pan above the batter line. This helps the cake to rise up evenly on the sides. 
4. Tap the pan on a table or counter to release any air bubbles.
5.Allow the cake to cool for 10 minutes after baking. No shorter or longer than 10 minutes. 
6. Pick up the pan with hot pads. Gently shake the cake sided to side. Use a plastic spatula to release any cake sticking along the edges. 
7. Invert the pan on a cooling rack or plate. Allow to finish cooling.
Now, on to baking the cake. I followed the above instructions very carefully. I had a positive attitude that this was going to work. 
While my cake was baking I started to think about all the times the cake stuck to an ordinary cake pan. "Oh, dear! How can this cake possibly not stick to such a detailed cake pan? I have never used baking spray before. I usually use butter and flour to coat my pans. I was pretty nervous. When I took the cake out of the over I got even more nervous. Ten minutes is a long time to sit and fret about this cake. Then the ten minutes were over! Time to invert my cake. I gave it a side to side shake .Loosened one spot on the edge. Flipped the cake onto a plate and shouted with joy!
The cake released with out one crumb sticking! I am so thrilled. Early that morning in anticipation of baking this cake I made a few fondant decorations to decorate the cake with. Thinking a beach sandcastle theme. 
I sculpted the fondant by hand and painted it with watered down food coloring. I may be doing a DIY on this technique in the near future. 
The sand around the base of the cake is ordinary brown sugar. I spread it around and sprinkled some on top.
Follow Chef's Corner on Facebook and Twitter.
Readers, What do you think about this bundt pan? What is your favorite cake flavor or decoration?

Grandma Bonnie's Closet received the product mentioned above for free. Regardless, I only recommend products or services I use personally and believe will be good for my readers.

Friday, August 30, 2013

Cake Decorating Made Easy With Royal Icing & Ateco Decorating Tube Set

Disclosure: Grandma Bonnie's Closet was not compensated for the review of this product. I received a free product from ShopAtDean.com in exchange for an honest opinion. The opinions expressed are my own.

If you are a long time reader of Grandma Bonnie's Closet then you know that one of my favorite hobbies is cake decorating. I am always looking for new and interesting cake decorating products to play with. I often browse online in my spare time looking at cake decorating sites and supply companies. That is how I came across Dean Supply Online. I sat for at least an hour looking at all their kitchen and baking supplies. Then I came across the Ateco 55 Piece Decorating Pastry Tube Set. I began to dream of all the lovely cakes I could make with this awesome set. I thought why not ask for a set to review. My readers enjoy making cakes for their grandchildren/children. You all do, right!
Dean Supply Online is a family run business of 63 years. If you ever visit Ohio and are in the Cleveland area you might want to visit their showroom on Woodland Ave. Hmm, I bet that would make a good blog post.

On with the review. A little over a week ago I received this lovely 55 piece Tube Set. I was impressed with Dean Supply's friendly service and amazingly fast shipping. That is one reason I like to support family owned and run businesses. A good family business puts their customers first and works to see that they are happy and satisfied. I am indeed happy and extremely satisfied.
The set includes two Rose/Flower nails, a coupler for changing tubes and 52 decorating tubes(tips). Included in the 52 tips are multiple writing tips, string tips, star tips, border tips, and leaf tips. Best of all, these beautiful tubes came in a nice heavy duty case for storage. 
This is a pastry filling tip. Imagine how easily I can fill donuts and cupcakes with custard fillings. I will be testing this tip out soon and let you all know how it works. 
The tube to your left is a grass or hair making tube. The tube at the right makes borders and can be used to make a basket weave design on cakes. (Stay tuned for a basket weave cake post in the near future.)
I found the tips easy to use, easy to clean and fun to decorate cakes with. The important thing about getting tips clean after use is a brush made for tube cleaning or a pipe cleaner. I found the tubes easy to clean with pipe cleaners. The coupler that came with the set makes it easy to fill one pastry bag with icing and easily interchange tubes through out the decorating process.  
I used the coupler in this pastry bag. Just drop in the first piece of the coupler. Then add the tube on the outside of the bag and place the ring over the tube. I dropped the bag into a glass and folded the bag over to make it easy to fill with Royal Icing. I then covered my cake in white fondant. I selected a few interesting tubes to test. 
First I used tube #070 for the draped border on the top edge. Then tube #32 for the bottom edge. Next, I tried the rose tube #127 with the large rose/flower nail. It took lots of practice to get a few flowers to even begin to look like a rose. Well, at least they resemble a rose of sorts. Finally, I used tubes #34 and #4 to make leaves and vines. 
Now, I have a surprise for you. This is my first attempt at a YouTube video. I would love for you to watch this short video. I am demonstrating the use of the above tubes while decorating a cake with Royal Icing. It is a short video and I do appreciate your support. Thank you for watching.


I hope you enjoyed the video. Follow Dean Supply Online with Facebook and Twitter. 

Sunday, July 21, 2013

Guest Post: New Cake from Life with Tootsabella and The Rose

So you all know how much I love making and decorating cakes. Well my daughter in law over at Life with Tootsabella and the Rose has been kind enough to Guest Post here today and share one of her cakes with my readers. I hope you enjoy and stop over to visit her blog.

I have recently started back up making cakes again now that my youngest is a bit older. Here is a cake that I had made for a boy going into high school. The school supplies that are on the wires are from Michaels in the scrap-booking area. I put straws in the cake to put the wire in so the lead from the wires did not go into the cake. The High School and Freshman sign are taped onto sucker sticks and stuck into the cake. It worked out really well. I had a wonderful time making this cake. If you want to see more of my cakes, check out Life with Tootsabella and The Rose. I have a Sofia the First cake on my blog. My kids are obsessed with Sofia and Doc McStuffins. I hope you enjoyed my post. Have a wonderful day!!

Monday, July 1, 2013

DIY: Turtle Birthday Cake

Little Roo's First birthday is coming up soon. While he was visiting we had a little birthday party for him. I love making my grand children's birthday cakes. My daughter has wanted to make it a tradition to make the birthday cakes for her children. I thought that was a fantastic idea so we decided she would make Little Roo's first birthday cake with only technical advice from grandma.

She started with three layers. We then decided to remove one layer as it seemed a little on the tall side. 
Next my daughter rolled out white fondant and draped it gently over the cake.
press the fondant to the sides of the cake starting at the top and slowly working down. Ease the folds and wrinkle out as you move down. Trim off the excess. 

She then added cut out fondant pieces by wetting the back of the cut outs with a bit of water.
Little Roo and Pooh Bear.
Crumbs are the best right?
Her first cake came out beautiful. What do you think?

Monday, March 25, 2013

Easter Bunny Cake

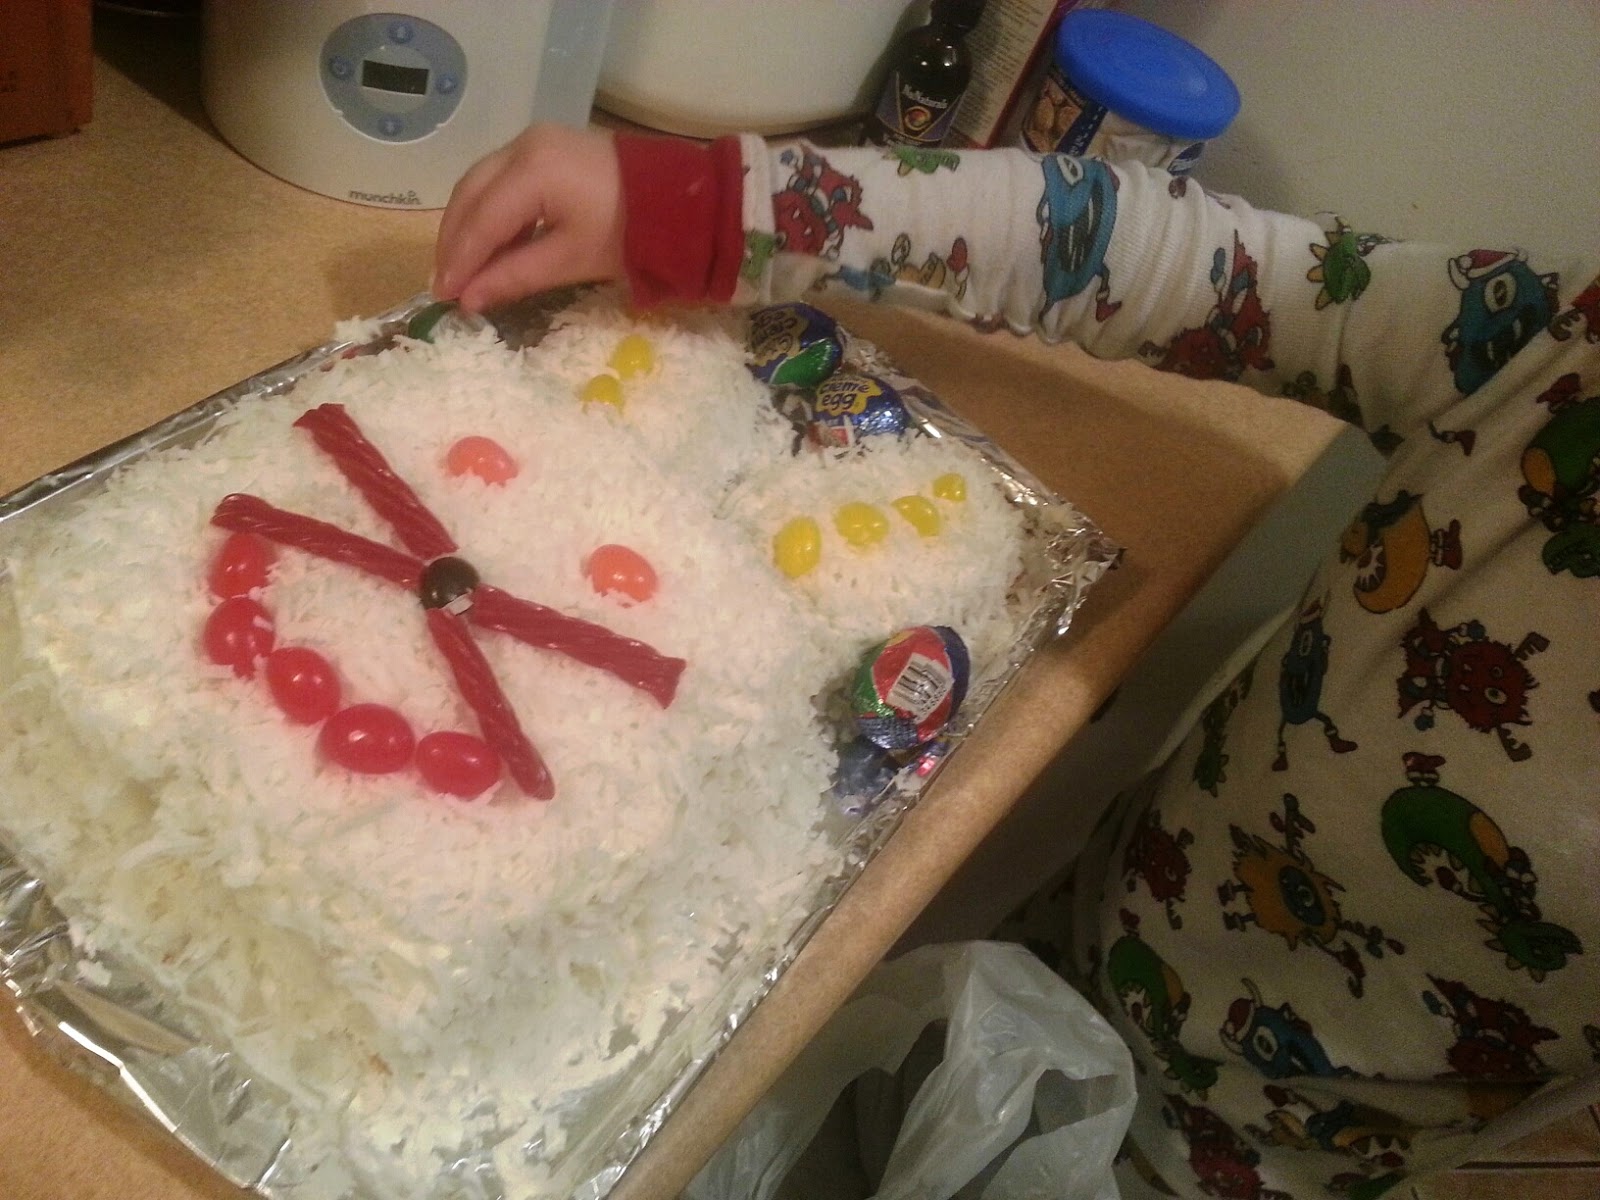
While off visiting my grandsons we had the enjoyment of making an Easter Cake. My grandson loves to help when ever I am baking so he was right in their learning how to frost a cake. I don't think I have ever taught a three year old how to frost a cake before. The experience was pure joy. Now I have made many nice Easter cakes before but I think this one was so easy and fun for my grandson that I will be making another this week with my granddaughters.
We used a cake mix. I normally make my cakes from scratch but it was much easier for my grandson to use a box mix. we prepare the cake as instructed on the box. I baked the cake in a 13 x 9 inch pan. When the cake was cooled I cut to pieces for ears and the remaining cake I cut in half and stacked.
My grandson iced the cake with butter cream frosting. we then covered the cake in shredded coconut. Last, we decorated with our favorite candies.


Have you decorated any cakes lately? What dessert do you have planned for Easter?

Tuesday, October 23, 2012

DIY: Decorating A Pumpkin Cake

Around this time every year I like to make a pumpkin cake for my son's birthday. This has become a tradition in our home. The cake you see here was made by myself, my daughter in law and my daughter.
Today I had to make my son's birthday cake on my own. I used the same technique as the above cake with just a little difference in the final touches.

First pour the cake batter into two stainless steal bowls (Pyrex glass bowls can be used) of the same size.
Once the cakes cool stack them together. Using icing between them to secure the cakes together.
Now apply a thin crumb layer of icing over the cake. At this point I laid foil (wax paper would also work) on the cake stand up against the bottom edge of the cake to catch the drips from the icing. This makes it easier to clean up the cake stand after icing.
The following step is my technique for getting smooth icing on a round cake. If you are using canned or homemade icing you will need to heat the icing in the microwave for a few seconds. You can also heat the icing on the stove in a double boiler. I heat it only to pouring consistency. Using a measuring cup pour the icing over the cake.

Once you have finished covering the cake you can spoon icing onto the lower half of the cake. This is where I changed my cake up this year. I used my cake spatula and pulled the icing up over the cake in single strokes. It made a textured pattern some what like a pumpkin.
Making the stem is very simple. I used a chunk of cake and spooned warm icing over the piece. Then lifted it onto the cake with a spatula.

This is my favorit part of making the cake. Decorate the cake with fall leaves. Using a piping tip and leaf tip decorate your cake with vines and leaves. Or just use fall leaves from a craft store.

Both cakes were easy and fun to make. It is nice to be able to make a cake with out buying a special pan. I have also made this same cake using a bunt cake pan. I did not like the results as much as I do using a mixing bowl. Do you have a cake decorating technique you would like to share? I would love to share your ideas with my readers.